
How to Grow Sprouted Potatoes
What is a seed potato? A potato that you can plant. Ta-da! They're nothing different than an organic potato you bought in the grocery store.
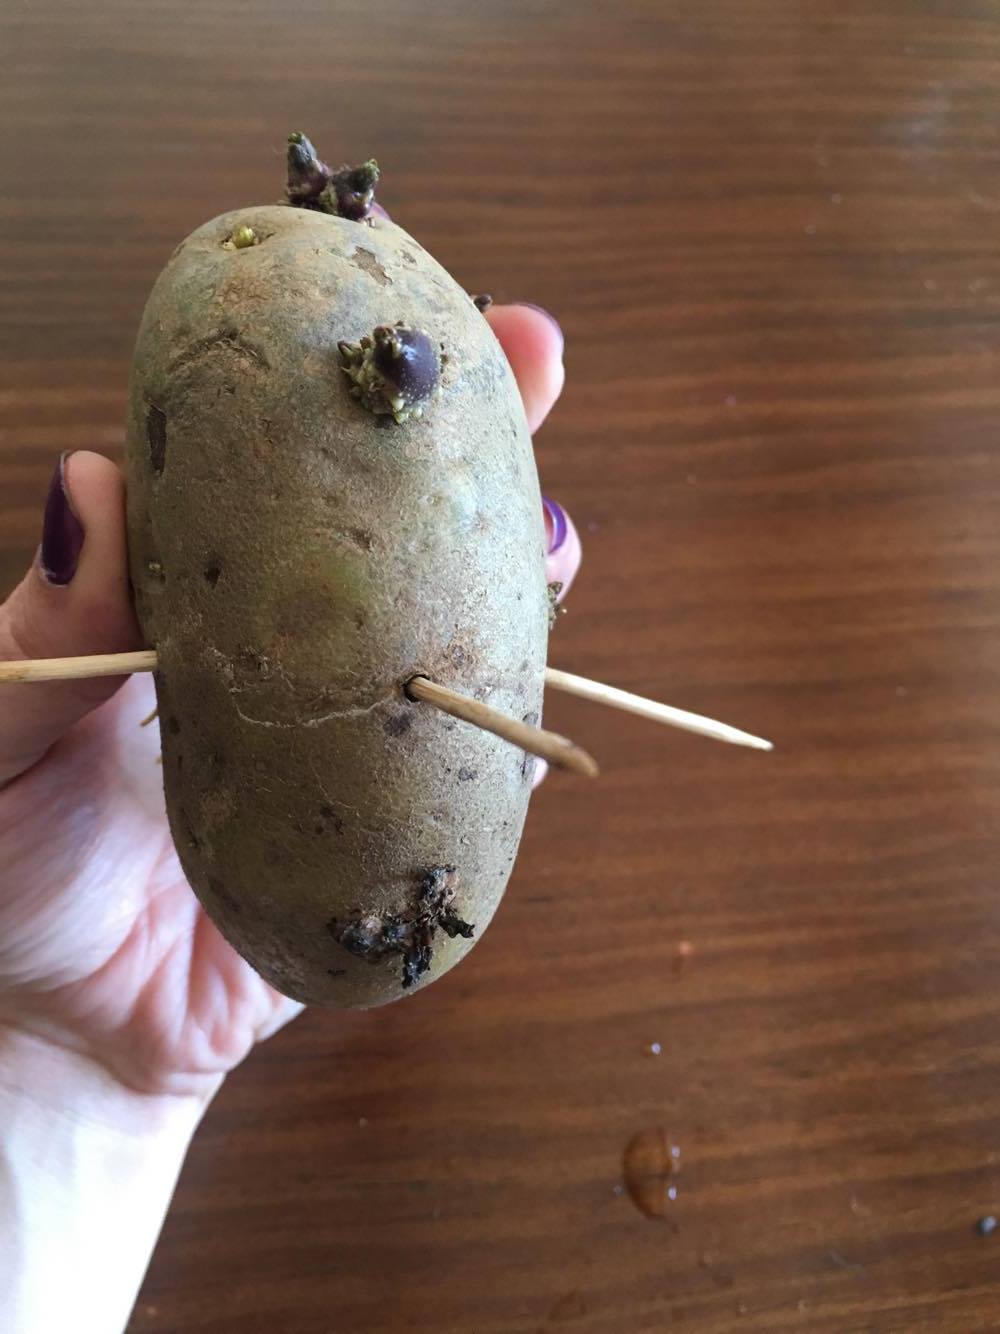

1st Step:
Stick your sprouted potato with enough toothpicks that it can be placed into a glass without falling in. Note the sprouted nubs? Those are the potato eyes and roots will grow from them.
Tip: Many sites recommend slicing a potato in half before sticking it with toothpicks and placing it in water to sprout. Every time I've tried that I've just wound up with a rotted potato and slimy water. There's no point in doing that. If you want to plant multiple potato plants, let multiple potatoes sprout in your pantry (usually not a problem for me).
 2nd Step:
Place the potato in a glass of water with at least one eye fully submerged.
3rd Step:
Change the water in the glass every day to prevent rot and encourage fresh root growth.
4th Step:
Once your potato has roots an inch long, go stick it in the dirt. Make sure that the entire potato is covered by 1" of soil. I prefer to grow my potatoes in trash cans for easy planting and easy harvest.
For growing potatoes in containers, make sure you have a large enough container for the type of potato you're growing. I've successfully grown red potatoes in 13 gallon trash cans. Baker potatoes and sweet potatoes are larger and I've successfully grown them in a 30 gallon trash can. Okay, I actually grew them in a rain barrel. The faucet on it developed a leak and rather than fixing it I reused the rain barrel as a potato growing container.
Prior to placing soil in the container of your choice, punch holes in the bottom. Another advantage to using trashcans to grow potatoes is that you can easily punch holes in the bottom with an electric drill or - very carefully, it will slip - with a hammer and nail. Also, potatoes grown in containers won't get attacked by grubs or other root eating pests.
You can grow them in the ground - of course- but you will need to prepare the ground first. Before planting, till the ground so it's loose for at least one foot down. Plant the potato in the top soil as normal, making sure the entire potato is covered by 1" of soil.
5th Step:
Once the potato's emerging vines are 6" tall, mound up more dirt around them. Adding more dirt on top of the growing potato ensures the soil isn't washed away exposing the potato. A potato exposed to sunlight turns green. A green potato means it's producing more chlorophyll and subsequently it's producing glycoalkaloids. If your potato turns green, it's rotting and will not grow. Subsequently the glycoalkaloids in a green potato are a toxin and shouldn't be eaten.

6th Step:
Water your potato regularly. Don't water so much that it's in standing water though because it will rot.
7th Step:
Harvest! New potatoes (the tiny ones) are usually ready to harvest after 10 weeks. For full sized potatoes, wait until the vines are all dead.
If you planted in a container such as a trashcan, dump the container out on a tarp, in an empty kiddy pool, or into your compost pile. With your hands gently sift through the dirt to find the potatoes. Brush off the dirt from each spud and store in a cool, dry place just like potatoes from the grocery store. Scrub clean before cooking.
If you planted directly in the ground, gently loosen the dirt with a fork or spade. Make sure you don't puncture any of the tubers. This is why I prefer to plant in a container. Planting in the dirt makes it a bit harder to find all of the potatoes and increases your chance of puncturing a tuber. Brush off the dirt from each spud and store in a cool, dry place just like potatoes from the grocery store. Scrub clean before cooking.
Tweet


Comments
Post a Comment